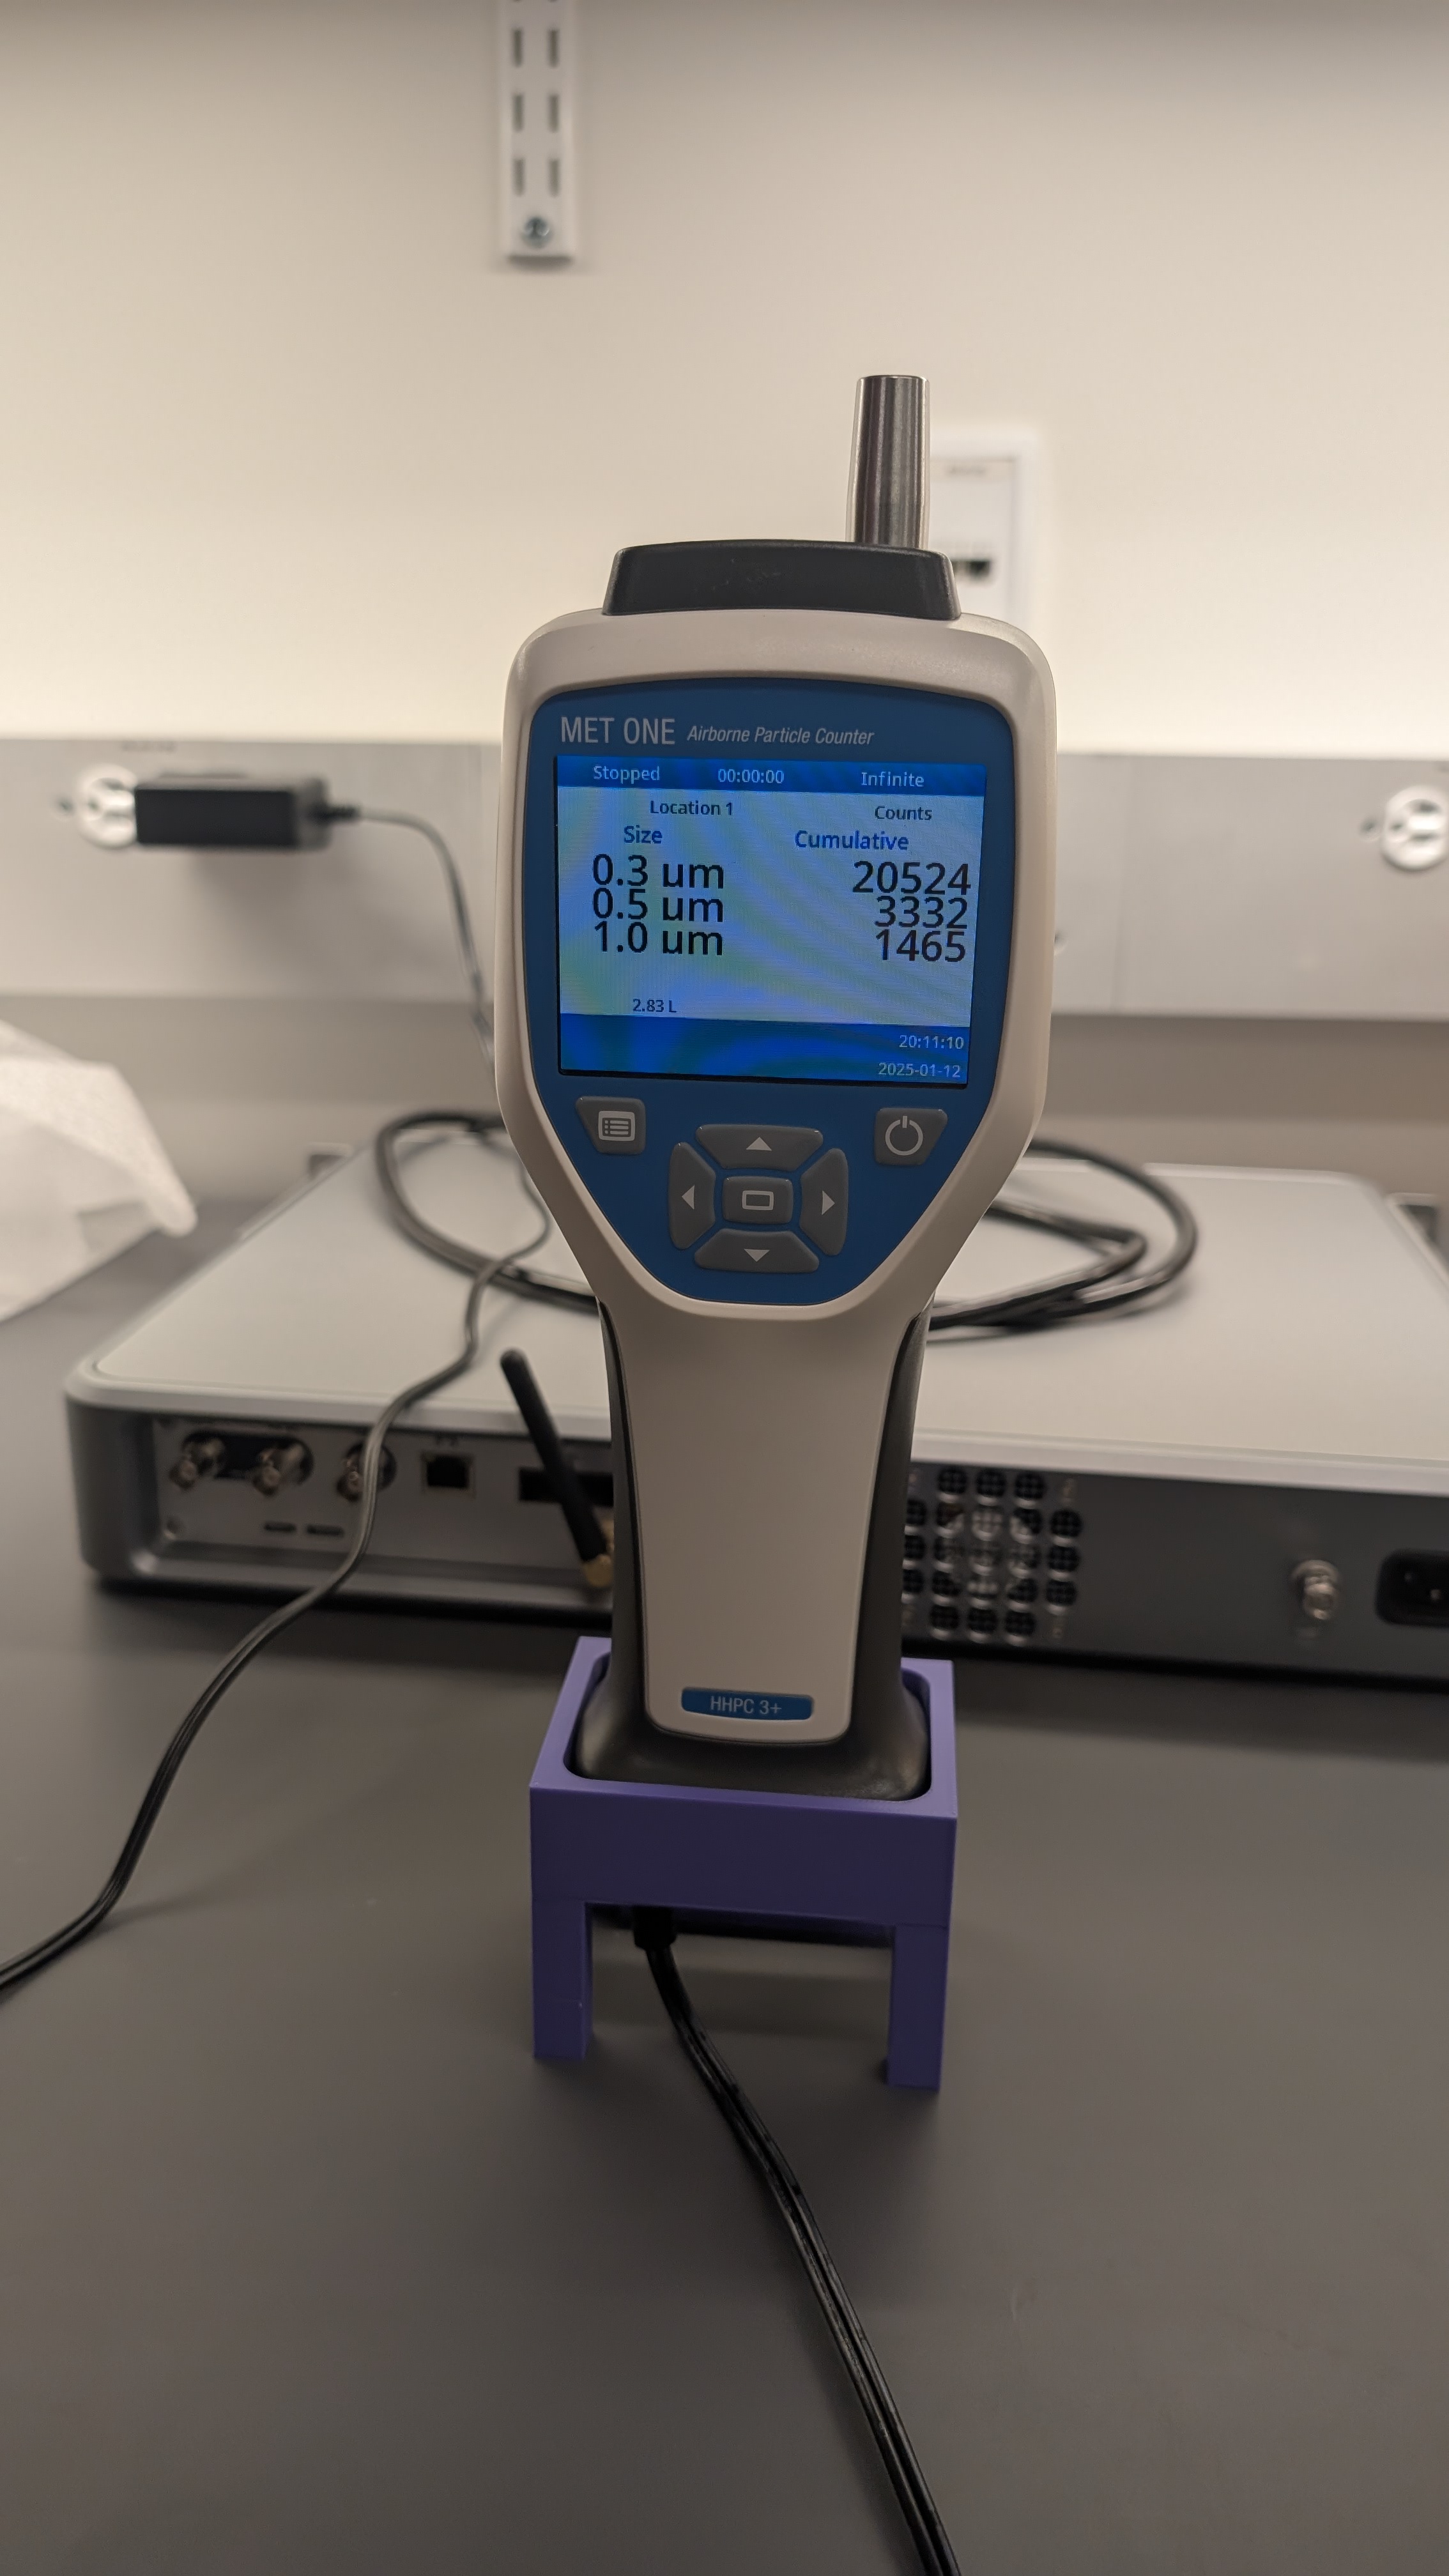
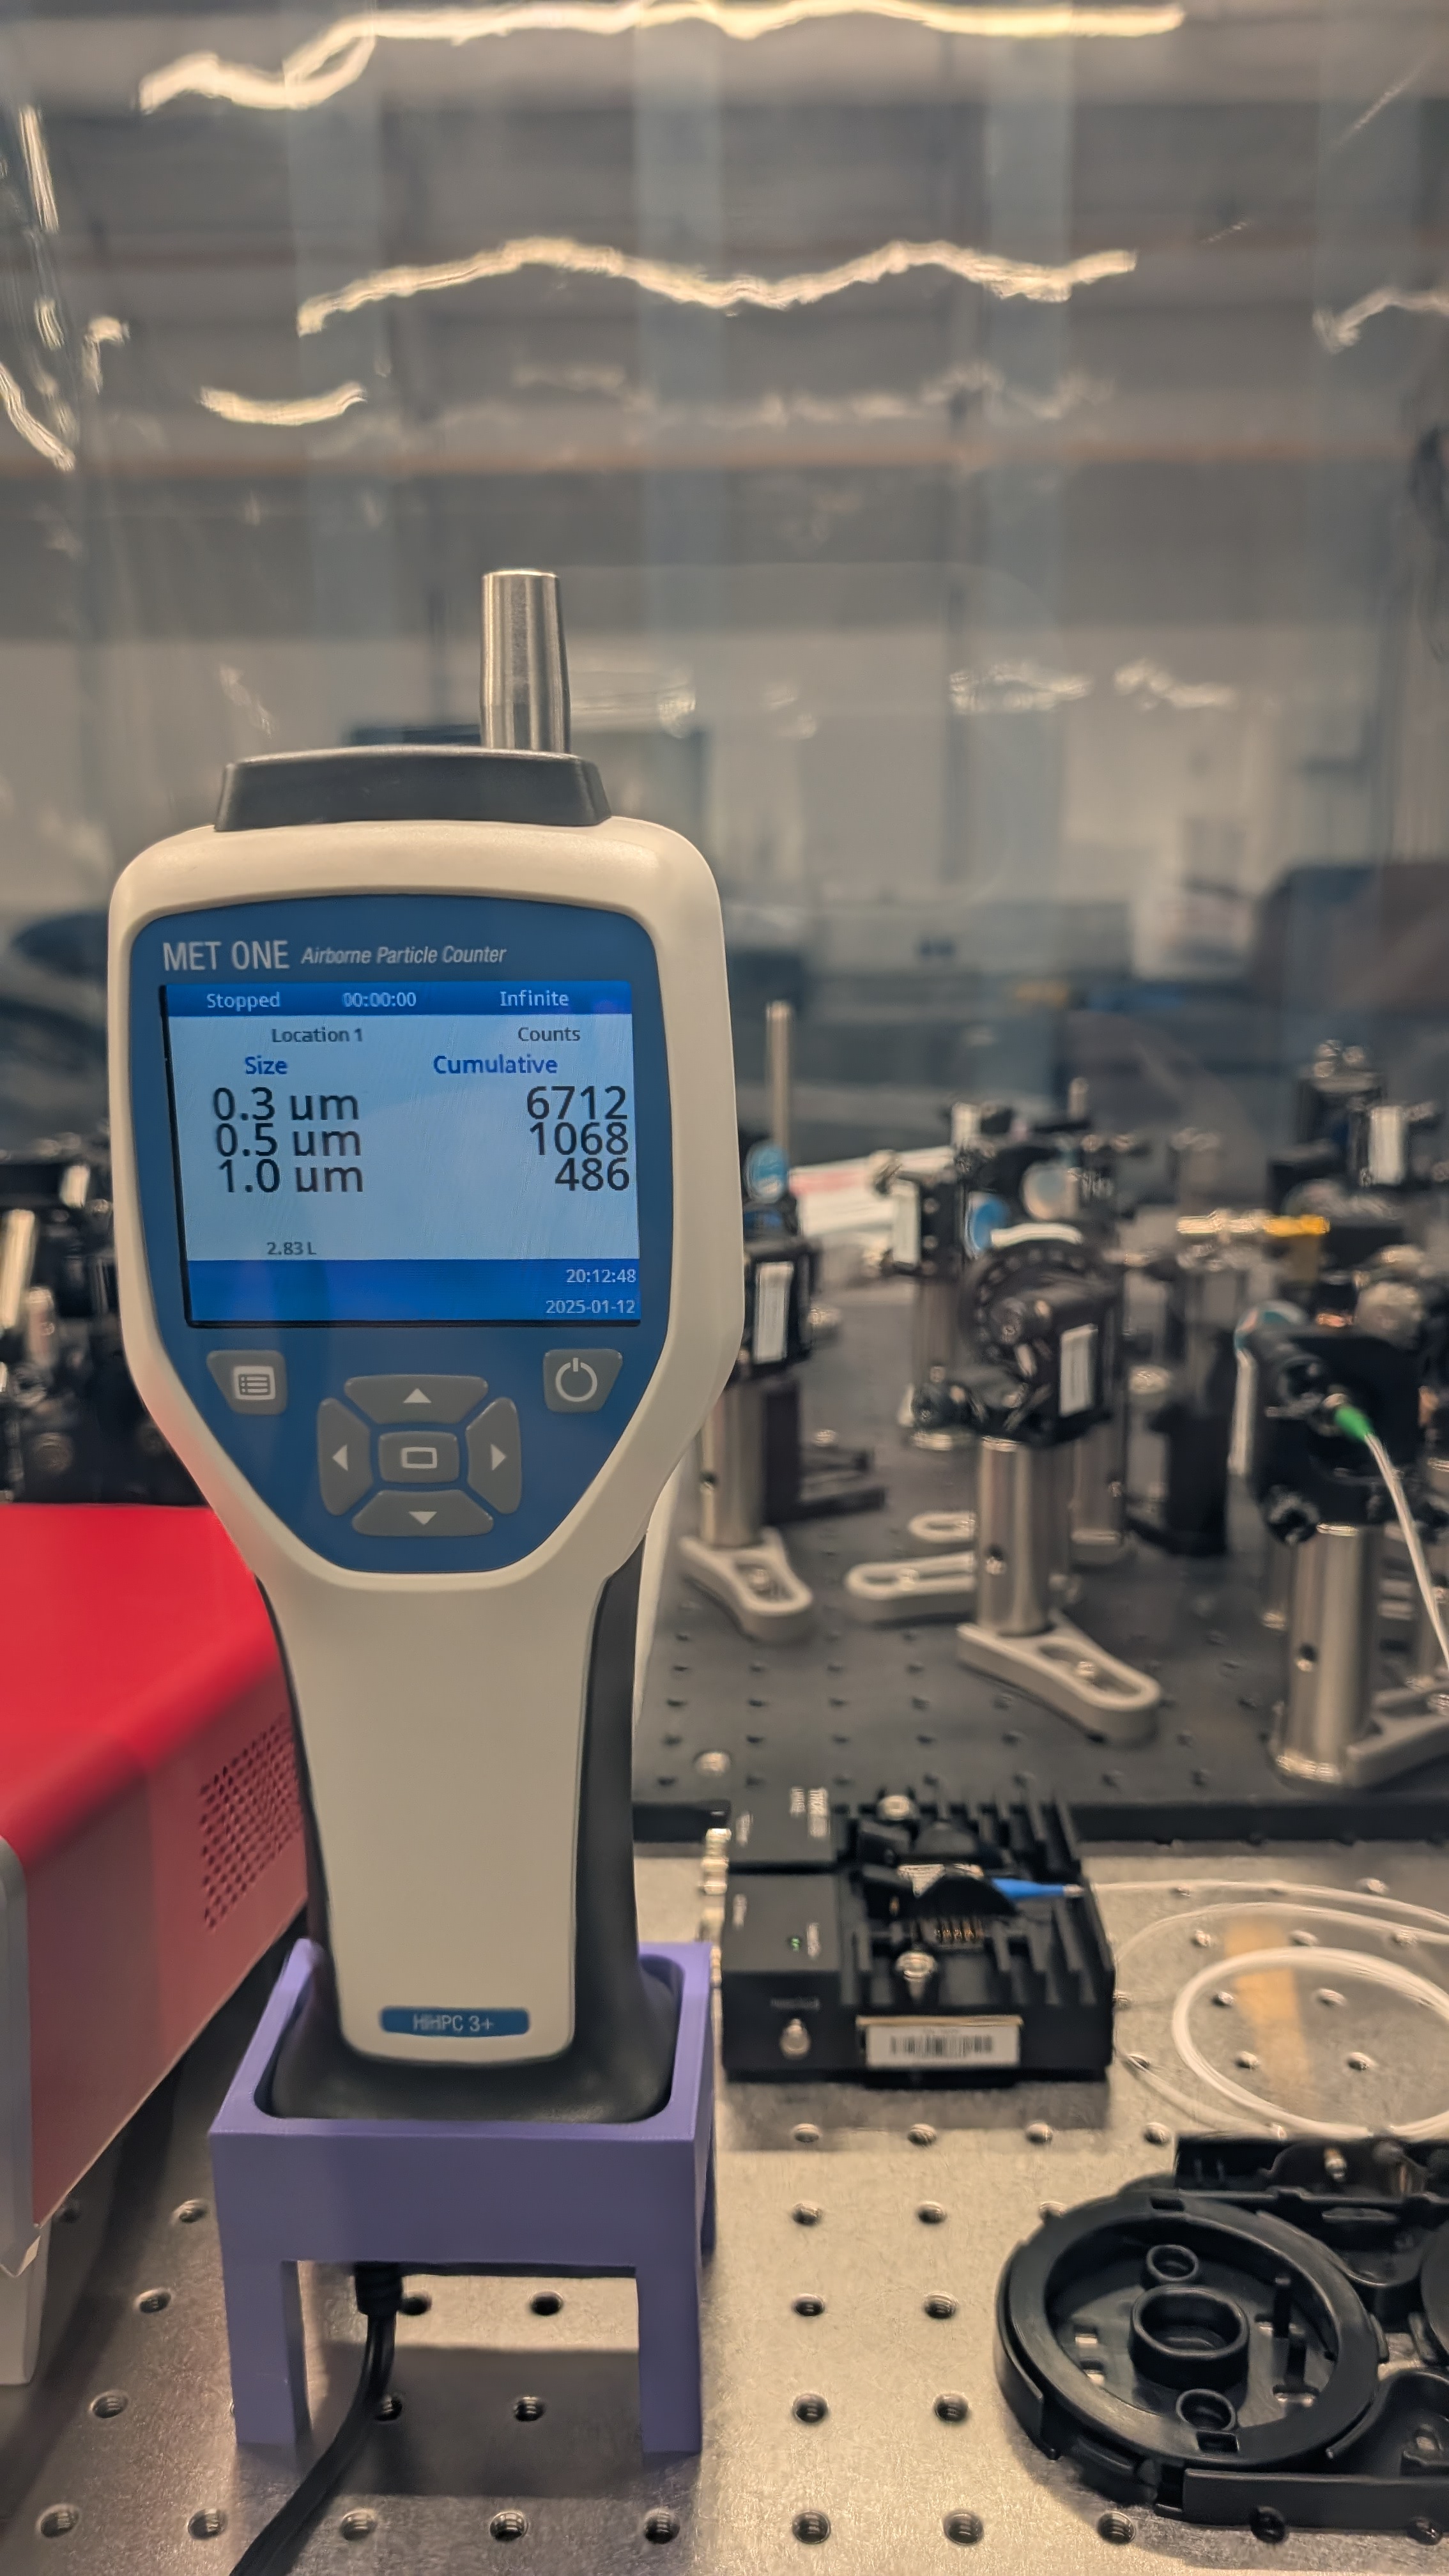
Displaying reports 241-260 of 1079.Go to page Start 9 10 11 12 13 14 15 16 17 End
Reports until 19:27, Tuesday 07 January 2025
Lasers Amplifiers
Daniel Grass - posted 19:27, Tuesday 07 January 2025 (12065)
Laser in B111B shut off due to risk of power outage from high wind or associated fires

I turned off the amplifier and seeder in B111B following our SOP.


Vacuum Systems General (GQuEST)
Daniel Grass - posted 17:13, Tuesday 07 January 2025 (12064)
Stuck Gasket removed with Locking Pliers and 4.5 in Blank Flange installed onto LFC Vacuum Cube reducing flange

I removed the stuck gasket (likely made of annealed copper) from a 10" to 4.5" reducing flange on the side of an LFC Vacuum Cube with the smallest of the 4 locking pliers I cleaned. I didn't try the other 3 locking pliers. I think I very lightly scuffed the inside of the vacuum area, but the knife edge looked good. I added a new 4.5" copper gasket and 4.5" blank flange and tightened the screws.

Vacuum Systems General
Daniel Grass - posted 15:49, Tuesday 07 January 2025 (12063)
Locking Pliers for UHV Class B Use Cleaned

I cleaned 4 locking pliers made of chrome vanadium steel for UHV Class B use (use around parts that will go inside vacuum). Per Maty Lesovsky's recommendation for greasy parts made of chrome vanadium steel, I cleaned the parts in acetone and then isopropanol. Water would rust the pliers, so I did not use it.

These pliers are specifically meant to remove suck gaskets, but these can be multi-purpose if kept clean.

Lab Infrastructure General
Daniel Grass - posted 15:28, Tuesday 07 January 2025 (12062)
Stainless Steel Container for Acetone Cleaned

I cleaned a stainless steel container and lid to clean parts with acetone. I rinsed and brushed the inside and outside with 1:30 Simple Green:DI Water, washed the outside with DI water, sonicated for 10 minutes with this solution inside the container, washed the inside with water, sonicated for 10 minutes with DI water, washed out the inside with acetone, and sonicated with acetone for 10 minutes. I then labeled the container and lid.

GQuEST Output Filter Cavities
Torrey Cullen - posted 13:35, Thursday 19 December 2024 (12061)
Chaining OFCs

[Jeff,Torrey]

Yesterday I attenuated the input to OFC1 1550 path so TRANS PD wasn't saturated and didn't mention it so I am doing so here. This gives an input to the cavity at 4.6 mW. The output while locked is 1.22 mW. It seems as though the cavity is not particularly closed to critically coupled, although this is not suprising based on the depth of the REFL dips. We chose a lens to put the output beam of OFC1 into a fiber that will connect to OFC2 input. The measured output of this fiber was 1.06 mW, which is an efficiency just over 86%. This could be improved but for now we will keep it here. I think for this measurement as long as we know of all the optical losses along the path, we don't care if there are any. This obviously changes when we are trying to get signal photons to an SNSPD. Additional sources of losses leading into OFC2:

-FC/APC connection between two fibers ( like this ). Quoted at .5 db insertion loss.

-A 50:50 fiber beamsplitter is plugged into the other side of the mating sleeve. This was to be able to do OFC2 and OFC3 things at the same time. This will be changed eventually but keeping it for now as I think its still useful. Quoted at 3.4 dB insertion loss and then obviously a 50:50 split. In a loss calculation refer to this for more details.

-Any optical losses between fiber output and input to cavity. Should be <1%.

After lunch we plan on swapping the fibers out so that the OFC1 output is seeding OFC2. Before doing this we took a mode scan of OFC2 with its original seed light. This is to compare mode scans directly between swapping the fibers. More to come after lunch.

Images attached to this report
Vacuum Systems General (GQuEST)
Daniel Grass - posted 17:03, Wednesday 18 December 2024 (12060)
10 in CF Flange to Rotatable 8 in CF Flange 12 in long Custom Nipple Installed on Laser Filter Cavity Output Vacuum Cube

[Jeff, Daniel]

We attached the 10 in CF Flange to Rotatable 8 in CF Flange 12 in long Custom Nipple onto the Laser Filter Cavity (LFC) Output Vacuum Cube. When dropping in the copper gasket, we used 12-14 bottom bolts instead of the usual 4 because the nipple applied a large torque pulling the top away from the cube. Otherwise, we installed it as usual and I tightened the bolts to 34 Nm.

Vacuum Systems General (GQuEST)
Daniel Grass - posted 14:43, Wednesday 18 December 2024 (12058)
10" to 4.5" CF Zero Length Reducer Flange on Laser Filter Cavity Output Vacuum Cube Cleaned but Copper Gasket is Stuck

[Jeff, Daniel]

We cleaned the non-vacuum portion of the 10" to 4.5" CF Zero Length Reducer Flange on Laser Filter Cavity (LFC) Output Vacuum Cube using wipes with isopropanol and acetone to remove sticky tape residue. This worked pretty well. We could not remove the copper gasket for the 4.5" CF Flange by hand or with careful use of a flathead screwdriver. This gasket is likely made of annealed copper and has been in place for ~10 years. We covered the area in UHV foil. Some sources on the internet recommend locking pliers. 

GQuEST Output Filter Cavities
Torrey Cullen - posted 12:13, Wednesday 18 December 2024 - last comment - 16:08, Wednesday 18 December 2024(12057)
OFC1 Cavity Realignment (continued)

Continuation of 12055.

I touched up the alignment of OFC1 1550 path until it looked good enough to lock. I locked the cavity with the laser in order to see a constant stream at the output. I then used this to align all of the transmission optics outlined in the previous post. This works great and everything is aligned. Here is an overhead shot of everything in action. Note the three cables coming from the flipper mirror. One is power, one is a physical button located on the side of the table that can be used to flip between the transmitted light on a camera/PD combo or chaining to the next cavity, and the third is a USB that can be hooked up to the computer but is not currently because i can't find a USB extension (this will also be cool because when we make guardians to control the cavities these can interface with python I believe). I really like this design where we can quickly flip between diagnostics and cavity chaining modes. Other minor note is the flip up mirror path being the diagnostic over the connection to the fiber should prevent us from having to make minor adjustments into the fiber when changing modes, but this MAY be required if the repeatability of the flip up mirror isn't good enough to center on the PD/camera each time. After clicking the button 15 ish times it seems like its more than enough, just something to watch for.

Saved some screenshots of some quick cavity scans. This is showing the REFL and TRANS bd of the 0,0 mode. Note that it does not look like the cavity is close to critically coupled (we have never seen this cavity critically coupled even in B102). And then this shows the difference in the 0,0 mode and the rest of the higher order modes leaking through. This may be able to be improved via finer alignment and adjusting mode matching but is more than enough for the science we want to do now.

I think I want to retake some ringdown measurements to see how dirty the cavities became after the move and align the output into the fiber that connects to OFC2. Pending this and a quality piezo lock on both cavities we are ready for a carrier suppression measurement of both cavities.

Images attached to this report
Comments related to this report
Torrey Cullen - 16:08, Wednesday 18 December 2024 (12059)

With things realigned, did a quick check that we didn't dirty the mirrors in OFC1. OFC1finesseaftermove.png results from breaking a 1550 lock in 3 different ways (data is at "\Nextcloud\GQuEST\Measurement Data\OFC1 Finesse\" ). Finesse seems good, if not slightly higher than before.

Other couple of notes via screen shots: this shows the transmitted signal in blue. This is a good visual interpretation for how good the laser lock is currently. Losing lock and regaining on the 50 us scale. The max lock loss is roughly 1/4 the total transmission.

This one shows that the UGF for this loop is much lower now that the LNA is in front of the laser control. There should be a factor of 10. Also moving the UGF above 20 Hz rings something up at around 40 kHz. I believe this is new.

Images attached to this comment
Vacuum Systems General (GQuEST)
Daniel Grass - posted 20:33, Tuesday 17 December 2024 (12056)
10 in CF Zero Length Reducer Flanges moved on Laser Filter Cavity Output and Demonstrator Interferometer Vacuum Cubes

[Ian, Daniel]

We removed the 10" to 2.75" CF Zero Length Reducer Flange from the Laser Filter Cavity (LFC) Output Vacuum Cube and put it on the "output port" of the Demonstrator Interferometer Vacuum Cube. We cleaned the vacuum and surrounding areas near this output port on the cube before placing the flange.

We removed a 4.5" CF Window (presumably AR coated for 1064 nm light), wrapped it in a dried out clean room wipe that was previously wetted in isopropanol for UHV, wrapped that in foil, put it in an anti-static bag, labeled, and put it away.

We removed the 10" to 4.5" CF Zero Length Reducer Flange now with UHV foil where the window was previously attached, cleaned the flange, and placed it on the newly opened spot on the LFC Vacuum Cube.

I then tightened the bolts on these two 10" CF Zero Length Reducer Flanges to 34 Nm.

I hope to finish work on the LFC Output Vacuum Cube tomorrow, which involves cleaning the 10" to 4.5" CF Zero Length Reducer Flange outside from tape residue, placing a 4.5" blank flange, and adding the custom 10" to 8" nipple.

GQuEST Output Filter Cavities
Jeffrey Wack - posted 17:58, Tuesday 17 December 2024 (12055)
OFC1 Cavity Realignment (continued)

[Torrey, Jeff]

Today we continued the re-alignment of output filter cavity one. The 775 path is now aligned well enough to lock, and the 1550 path is aligned well enough to see flashes in transmission but still needs input alignment tuning to suppress the higher-order modes.

As discussed in [12053], we decided to realign the first output filter cavity in order to avoid the 775 beam clipping the piezo mount on transmission. It was clear that the piezo controlled mirror was a bit crooked (pitched down), and this required a wonky input alignment which led to clipping. We dissasembled and reassembled the piezo optic assembly and found that we could change the tilt of the mirror significantly by changing the compression of the viton by a very small amount, from which we conclude that the viton is being scrunched and we had perhaps been over-tightening it. We also experimented with a few rotations of the assembly, and the configuration we settled on was a 90 degree rotation from where we started. After this the mirror was noticably less wonky, and we proceeded with realigning the cavity, doing the 775 path first as it is more geometrically constrained by exiting through the piezo.

We performed a coarse alignement by removing the 775 input mirror and then using the cavity mirrors to postion the round-trip beam to be coincident with the incoming beam at approximately the location of the input mirror. We then used an iris to mark the round trip beam after it leaves the cavity, and after replacing the input mirror we tuned it such that the prompt reflection hit the same iris. This worked well enough to see a second pass beam in transmission, from which we could do further alignment.

We tuned up the cavity and input alignment to maximize power in the 775 0,0 mode (see attatched scan on the photodiode).

Next we roughly aligned the 1550 in an analogus way by removing the input mirror, etc. We are now seeing lots of modes flashing during a scan, and will continue to tune up the input alignment to eliminate the higher order modes. We also started setup for a fiber coupler to send the light to the second filter cavity, using a flipper mirror to toggle between diagnostic (camera and PD) and fiber coupler. (see attatched diagram)

Images attached to this report
Non-image files attached to this report
Vacuum Systems General (GQuEST)
Daniel Grass - posted 17:49, Monday 16 December 2024 - last comment - 16:41, Tuesday 14 January 2025(12054)
CF0600S2, 4.5 in blank flange, and 2.75 in blank flange added to LFC Vacuum Cube

[Jeff, Daniel]

I tightened the 10" to 4.5" zero length reducer flange on top of the vacuum cube.

We added the CF0600S2 6" to two 2.75" CF Multiport Reducer to the 10" to 6" CF Zero Length Reducer. We did the usual method of placing the flange using some top screws to hold it, adding 2 bottom screws, remove the top screws, tilting the flange up, dropping in the gasket, and then adding the remaining screws. Only a few screws were accessible with our torque wrenches, so I tightened the screws by hand in a star pattern (going every 5 screws with 16 total). We bought this part (as part of a set) so that the torque wrenches can reach all the screws.

We took off a plastic cover and cleaned the 10" to 4.5" reducer flange, which was covered with duct tape (and duct tape residue) outside where the 4.5" flange goes (and outside the vacuum). 

We added a 4.5" CF blank flange to this 10" to 4.5" reducer flange on top of the vacuum cube. Because there were only 8 screws, I started at a lower torque, 6 N m, did a star pattern every 3 screws so that every screw was tightened twice, and incremented the torque by 1 N m until the torque was 12 N m, then I incremented the torque by 3 N m until 34 N m when the flange seemed tight enough (stainless steel contact around ~70% of the surface).

We added a 2.75" CF blank flange to the CF0600S2 (where the laser view port will not go) and attached it with the plate nuts. I lightly torqued by hand and used the torque wrench starting at its minimum value of 6 N m. I tightened every 2-3 bolts until the torque wrench did not tighten the bolts further, then incremented the torque by 1 N m until 14 N m. For the laser viewport, we will use the annealed copper gasket, which will require less torque to tighten.

Next, we will swap out the 10" to 2.75" reducer flange for a 10" to 4.5" reducer flange because the 10" to 2.75" flange is needed for the demonstrator IFO.

Comments related to this report
Daniel Grass - 16:41, Tuesday 14 January 2025 (12077)

I forgot to note at the time that the gasket for the 6" flange had some discoloration/very light scratches on one face, but I think this is fine.

GQuEST Output Filter Cavities
Torrey Cullen - posted 17:23, Monday 16 December 2024 (12053)
OFC1 Cavity Realignment

[Jeff, Torrey]

Over the last week I have been struggling to get OFC1 realigned. The 1550 path can be locked on a very clean 0,0 mode. The 775 light on the other hand caused a few issues, the main problem being it was resonant but badly clipping on the piezo as it exited the cavity. The 775 light looked like it was hitting the piezo mirror at the top left of the mirror. We then locked the 1550 light and used the SWIR camera to look at the 775 output coupler. This showed alot of scattered light, but no solid beam. After breaking the cavity this scatter disappeared completely, suggesting the resonant path in the cavity hits the piezo upon exiting. We took off the 1550 input coupler to confirm this and it was hitting the same top left portion of the piezo mirror. 

With this information we have decided to adjust the inter cavity mirror alignment. The piezo mirror has a significant amount of down tilt since it was first contacted and re-set. Our plan tomorrow is to align the 775 input, but first take apart the piezo mirror and reassemble so that it sets in a different alignment. 

GQuEST Output Filter Cavities
Torrey Cullen - posted 17:08, Monday 16 December 2024 (12051)
Fiber Management in B111B

I've installed a few of the fiber holders that Ian suggested we purchase. They seem pretty decent. A few of the fibers at the inputs got misaligned when feeding them into the holders and I corrected for this. The main drawback was that they take up a large amount of space compared to just looping them. This may be a problem as we become more progressed in the experiment.

Images attached to this report
Equipment General
Ian MacMillan - posted 15:45, Monday 16 December 2024 (12050)
Drill Press Base Replacement

Previously [11987] when attaching the Wen drill press to the table, the base of the drill press broke and sent the drill press falling to the ground off the table. I contacted Wen and they sent me a replacement base for free. I have now attached the replacement base to the drill press and stood the drill press upright as seen in the attached image (Drill_Press_Upright.jpeg). I turned it on to make sure it worked and it seems to be working fine. the chuck fell out of the drill press when it fell and will need to be reseated. Next I will try to attach it to the table again.

Images attached to this report
Vacuum Systems General (GQuEST)
Daniel Grass - posted 18:06, Friday 13 December 2024 (12048)
Screws Tightened on Two 10 in Flanges on Downstream LFC Vacuum Cube

I tightened the screws 10" to 6" zero length reducer flange to 34 Nm in which most of the flange contacted the vacuum cube and the copper gasket could no longer be seen. It took 40 Nm to tighten the screws on the 10" diameter electronics flange such that there was this contact. This is a flange from the Holometer, so maybe they require this higher torque spec. Alternatively, this could be a coincidence. There is a small notch milled out of this flange, but it shouldn't make a difference.

Computing General
Jeffrey Wack - posted 16:57, Friday 13 December 2024 - last comment - 17:04, Friday 13 December 2024(12046)
Gouy (Intel NUC) moved to B11B

I have moved the Intel NUC named Gouy from B102 to the control room in B111B since it does not see use in B111B and it is already set up with a CDS virtual machine.

I connected this machine via ethernet to the wall, and initially it said 'unidentified network' and 'no internet.' After setting the DNS address to our internal DNS, it successfully connects to the internet, but it says the network is called 'pLANck 2', what is this network? It appears to be on the subnet, it recieved a '248' IPv4 address, and on windows it is able to resolve names stored on our DNS.

In order to boot the VM I had to change the network adapter settings. Inside the VM it is connected to the internet, but it is not able to resolve names from the local DNS.

cat /etc/resolv.conf
# Generated by NetworkManager
search caltech.edu
nameserver 131.215.254.100
nameserver 192.168.248.15

It has our local DNS listed as an alternate, but it does not seem to ask our DNS if the Caltech DNS says 'not a thing.'

https://superuser.com/questions/681357/alternate-dns-server-not-resolving-after-first-one-fails-to-resolve

https://unix.stackexchange.com/questions/577222/alternative-dns-server-cannot-resolve


Comments related to this report
Lee McCuller - 17:04, Friday 13 December 2024 (12047)

After reading a bit more about DNS lookup, it looks like we'll need to switch the internal DNS to be the primary for this to work. I'll put in a request

Equipment Loans
Torrey Cullen - posted 14:36, Friday 13 December 2024 - last comment - 09:02, Monday 16 December 2024(12045)
350-2000nm IR viewer loan from cryo lab

[Torrey, JC]

JC and I picked the lock of the locked lista cabinet in the cryo lab and got the IR viewer. I used it to observe the power distribution center. I did not observe any significant amounts of scattered 1550nm light. There was a fair amount visible on the SHG sled where irises are being used to block the 0th order beam but this is 775. The amount of power there is known to be low though, I don't think this is an issue. 

In short, I'm not sure we need one of these viewers. I could not observe any scatter where I expected there to be some. It could easily see 775 nm, as expected as they are several orders of magnitude more sensative at this wavelength. One caveat potentially is this looks like a much older model than what is currently being sold, maybe the technology has improved since this older version.

Images attached to this report
Comments related to this report
Ian MacMillan - 09:02, Monday 16 December 2024 (12049)

This loan has been posted to the Adhikari elog. Please update when it is returned.

Lab Infrastructure General
Daniel Grass - posted 19:38, Tuesday 26 November 2024 - last comment - 17:17, Monday 16 December 2024(12023)
USB Cable from Vacuum Oven in B110 to B111B Control Room Computer Set Up

[Sander, Daniel]

We routed a USB Extension Cable from the vacuum oven in B110 through B111D to the B111B control room. The cable trays above the mobile clean rooms in B111B were very hard to access. Maybe we should get some sort of cheap grabber tool from Amazon.

The cables make it to the computers in B111B but just barely. A ~6 ft USB extension cable would ensure there is plenty of slack in the system.

The computer recognized that something was plugged in, so it seems the extension cables work. Next week, I will finish setting up the vacuum oven software that I downloaded. I previously got this software to work on my laptop.

Comments related to this report
Daniel Grass - 16:19, Monday 02 December 2024 (12025)

The computer is able to communicate with the vacuum oven after very minimal software setup.

Daniel Grass - 17:17, Monday 16 December 2024 (12052)

I added another 50" USB extension so that there isn't tension on the cables. This is ~45" too long, but the extra cable is not in the way and the oven is able to communicate with the computer and vice versa.

Displaying reports 241-260 of 1079.Go to page Start 9 10 11 12 13 14 15 16 17 End