Displaying reports 741-760 of 1093.Go to page Start 34 35 36 37 38 39 40 41 42 End
Reports until 11:56, Tuesday 07 May 2024
GQuEST Output Filter Cavities (GQuEST)
Daniel Grass - posted 11:56, Tuesday 07 May 2024 - last comment - 20:20, Thursday 23 May 2024(11557)
Piezo Alignment Tool

[Torrey, Daniel]

Torrey thinks that the central axes of the piezo and the mirror are misaligned. I designed a part that aligns the small piezo and a 1/4 in thick spacer with a #8 through hole with the "piezo top". This piezo top should be well aligned with the piezo bottom that holds the mirror. I believe this should give alignment of the axes to within ~5 thou rms (3 thou from the piezo top to the base, 4 thou from the mirror in the SM1 threads, and ~1 thou from this tool).

Attached is the part file with CAM as well. I decided to make this part in a CNC Lathe for its precision compared to a 3D print. An important consideration is the radius of curvature of the cutting tool. This is why there is a notch toward the thickest part of the tool and why the levels of the tool don't match the levels of each part. If one were to 3D print this part, they should remove the notch so that there are no overhung sections.

The blue colored photo is the CAM simulation.

Images attached to this report
Non-image files attached to this report
Comments related to this report
Daniel Grass - 14:24, Tuesday 14 May 2024 (11571)

I also made an alignment tool for a larger Thorlabs ring piezo. This requires a larger spacer, so I made a 1/4 thick (actually ~0.24 in) ring with a 1 in OD and ~0.358 in ID, slightly larger than the 9 mm ID of the ring piezo. This ring is aluminum because I didn't want to machine steel because it's tougher. 

Attached is this file (medium) and STL files for this part and the other part.

I made this part on the CNC lathe and it fits well.

I also manually made a part to align the noliac piezo. This is essentially a 0.7" long rod with a 0.47" diameter and a 0.25" thick, 0.5" diameter cap so the rod doesn't go all the way into the piezo assembly. There isn't a part file for this.

This Noliac part was too large. The noliac ID appears to be closer to 0.463"

Non-image files attached to this comment
Daniel Grass - 20:17, Thursday 16 May 2024 (11584)

I made a piezo alignment tool for the Noliac NAC2125-H08. The diameter of this tool is 0.460" and it fits pretty smoothly around the piezo. Attached is the SolidWorks File (with CAM as well) and the file as an STL.

Non-image files attached to this comment
Daniel Grass - 20:20, Thursday 23 May 2024 (11610)

The Noliac piezo is a bit loose around the 0.46" diameter part, so I printed a conical version. I would have printed a version with a smaller conical angle, but I was worried about getting the part stuck because a 1-3 degree taper is prone to getting stuck.

Non-image files attached to this comment
GQuEST Output Filter Cavities
Torrey Cullen - posted 10:17, Tuesday 07 May 2024 - last comment - 12:00, Tuesday 07 May 2024(11556)
Filter Cavity Piezo Mirror Alignment

[Daniel, Torrey]

The theory from post 11547 was that the centering of the piezo on the back of the mirror in the cavity was improved (accidentally) between swapping them out while Masayuki visited the lab. This potentially improved the quality of lock drastically. Because the small thorlabs piezo has proved the best in the cavity, we need a way to repeatedly align the piezo in the center of the back of the mirror. However, Daniel's compression design to hold the piezo in place was not designed for a piezo so small. To combat this Daniel has machined a part will help align the small thorlabs piezo in the piezo compression set up. See 5ED5222C-108A-401E-993C-77349E63ED9C.jpg. The skiniest cylinder on this piece is the same as the inner diameter as the small thorlabs piezo. 

Additionally, we noticed that the spacer being used in the piezo assembly was one with an inner diameter for a 1/4-20 screw. This is close to the size of the outer diameter of the small piezo. We swapped out this spacer to one with a smaller inner diameter so the piezo has more to rest on. With the previous spacer the piezo didn't have a full, flat surface to rest on. Alignment hasn't been recovered, update on the effects of centering/new spacer to follow.

Images attached to this report
Comments related to this report
Torrey Cullen - 12:00, Tuesday 07 May 2024 (11558)

Quick comment showing this Size comparison of the previous spacer vs the size of the piezo. A spacer with a smaller inner diameter is now in place.

Images attached to this comment
GQuEST Output Filter Cavities
Torrey Cullen - posted 10:06, Tuesday 07 May 2024 (11555)
Filter cavity and (more) optimal controls

[Jeff, Ian, Torrey]

With results from 11547 and 11541, we have a calibrated spectrum in m/sqrt(Hz) of the filter cavity. From this calibrated noise spectrum the goal now is design a controller that minimizes the noise when multiplying by the closed loop gain. However, after playing with the moku alot there are a few caviots. 

1) Ideally we would upload a custom filter with the desired shape into the low pass filter in the laser lock box. However, the moku requires a text file with the filter described in second order sections (SOS). Most places that you can upload a filter allow up to four rows of SOS to describe your controller. For some reason at only this low pass filter in the laser lock box, it only allows less than 3 (haven't tried 2 rows, but doesn't except 3). This allows us potentially with 4 poles and zeros to describe your optimal filter, which is not ideal.

2) The second idea was to upload the full controller in the digital filter box (DFB) where the summing of the excitation signal is used when taking transfer functions. The problem with this is it saturates the scan signal and therefore the output going to the piezo, meaning we can't actuate on the length of cavity. It seems two things saturate this signal: having any amount of gain at DC in the controller and having a positive gain near the resonant frequency, which at the time of this experiment was 8.25 kHz (this may have changed, see future log post). Both of these are problematic, but not being able to have any gain at low frequencies makes this not useable.

In order to get around this, I split the controller up into two parts. The first part is in the fast controller of the lock box, and the second is a filter still uploaded to the DFB, but taking into account that there is some shaping in the laser lock box. So now what this looks like is, we use previous results to design a (more) optimal controller, divide out the shape of the fast controller to get the shape that should be uploaded into the DFB. The idea being that one can lock the cavity with just the laser lock box and then turn on the custom DFB filter as a noise eater, to further improve the quality of lock.

So, for example, if we thought optimalshape.png was our optimal controller, we can find the filter that when doing Fast_Controller * mystery_filter = optimal_shape. optimalproduct.png shows roughly what this looked like. Converting this to SOS and uploading to the moku using Jeff's code makes the cavity lock much worse.  My best guess at the moment is that there is a flaw in our understanding of the actual noise in the system, leading to a controller that isn't supressing at the correct frequencies. More investigation is needed.

Images attached to this report
Computing General
Lee McCuller - posted 08:02, Tuesday 07 May 2024 (11554)
nextcloud updated

I fixed the certificate on the nxc server and updated it. Should be happier and stop pushing notifications to update.

Atoms General
Daniel Grass - posted 23:17, Monday 06 May 2024 - last comment - 23:40, Monday 06 May 2024(11552)
Atoms Experiment Vacuum Requirements

Ideal Vac Modular Vacuum Chamber:

Spec leak rate: 1*10^-8 mbar L/s = 10^-9 Pa m^3/s

This leak rate can be thought of as "being the amount of gas that flows through a leak at a given pressure differential per time"

TwisTorr 74 FS Turbo Pump pumping speed of N^2 below 10^-5 Torr: 70 L/s = 0.07 m^3/s

So the final pressure would be spec leak rate/pumping speed = 1.4*10^-8 Pa = 1*10^-10 Torr

In reality, the minimum pressure of the turbo is 3*10^-10 Torr, and the pumping speed gets worse near this pressure

In addition, ideal vac quotes the minimum pressure as 10^-8 Torr


How long does it take to reach this pressure? Let's use the Pfeiffer vacuum calculator

Volume: 6" tall, overhead view composed of an octagon with 6" sides and a 12" x 6" rectangle: 1,475 in^3 = 0.0242 m^3

Surface area: 960 in^2 = 0.6 m^2 (no internals assumed for this model, should be accurate to a factor of 2 when we stuff the chamber full of mirror mounts)

Assumed desorption rate: 10^-10 mbar L/(s*cm^2) = 10^-7 Pa m^3/(s*m^2), which Pfeiffier quotes as a moderately good baked system rate

Pump configuration: HiScroll 6 (~6 m^3/h), 1 m of 1.5" diameter tubing, HiPace 80 Neo DN63 (~80 L/s), pretty similar to our intended setup (we'll use Agilent)

1 hour to reach 10 Torr and turn on the turbo, 3 hours to reach 10^-8 Torr, final pressure 3*10^-10 Torr (this last figure is dubious since the ideal vac chambers aren't rated this low)


Ion pump requirements: 

spec leak rate/final pressure = 1*10^-8 mbar L/s  / 10^-8 Torr = 10^-9 Pa m^3/s / 10^-6 Pa = 10^-3 m^3/s = 1 L/s

So in theory we could get away with the VacIon 2 L/s Pump for ~$1000 (plus a $1700 controller?)

Since Nick's lab had trouble with these chambers, and I'm not sure Maria's lab saw great pressures either without cryopumping, it's probably wise to get a larger ion pump.


I'm pretty sure I set up the calculations right but someone with more experience should check

Comments related to this report
Daniel Grass - 23:40, Monday 06 May 2024 (11553)

Possible ion pumps:

0.8 L/s: $900 (9130041M011)

2 L/s: $900 (9190520)

10 L/s: $2500 (9195005)

20 L/s: $2500 (9191114)

40 L/s: $3400 (9191210)

55 L/s: $3400 (9191314)


Seems like the 2, 20, or 55 L/s options are the best in terms of pump out speed per cost


All ion pump controllers are between $1,600 and $1,800

Computing General
Lee McCuller - posted 15:49, Friday 03 May 2024 (11550)
Gitlab may be down for some time

Turning off the git.mccullerlab.com a bit to test performance. Request if you need to push and put it back up.

Lab Infrastructure General
Alex Ramirez - posted 16:02, Thursday 02 May 2024 (11549)
Photodiode Measurements of the new lab light fixtures

[Alex, Ian and Torrey]

We went down to the new lab with a photodiode and an oscilloscope to measure the lights and check if there were any signs of pulse width modulation. It seems that there was!

There were 3 types of lights seen downstairs, the table and optical lights which were led strip style dimmable lights, the overhead room lights, and some circular lights. 

As shown in our images below, sequentially, we tested these three sources and found the following:

Overall, this seems like it may be an issue as we have shown that the lights that will be illuminating our optics table are PWM. 

See the following photos below for snapshots of the oscilloscope.


Images attached to this report
GQuEST Output Filter Cavities
Torrey Cullen - posted 16:48, Wednesday 01 May 2024 (11547)
Cavity Calibration Cont.

The cavity is locking robustly with the piezo.

After the previous measurement (April 22) I went to test out this process with another piezo, the noliac. Was unsuccessful in locking the cavity only on the fast controller I believe because of the lower resonance on the noliac piezo. Because of this I swapped back to the small Thorlabs piezo. I believe this shifted the location of the piezo on the back of the mirror to a slightly different location, either matching where the beam is hitting on the mirror in the cavity or just now on the center of the mirror. This drastically improves performance of the cavity. This is the difference between this folder and the April 22. Attached are my previous analyses along with a new measurement of very robust piezo lock. By eye this seems to match the quality of lock that the laser provides. Data can be found at \Nextcloud\GQuEST\B102\Output Filter Cavity\FilterCavityScansAndTFs\May1st\test2\.

Note if recreating this: The measurement of G was good at much lower frequencies. Because of this I changed the region where we start approximating K as G. Change the hybridization window to 500-2000 Hz. This can be done in the hybrid() function in the script by changing the line where low_freqs and high_freqs are created to:

    low_freqs = np.arange(1,2000,1)

    new_freqs = np.arange(500,50001,1)

Images attached to this report
Controls General
Jeffrey Wack - posted 16:02, Wednesday 01 May 2024 (11546)
Setting Moku IIR filter

I have written a script to set and measure an IIR filter in the moku froma continuous time transfer function in zpk form. The script can be found in labutils and attatched to this post.

The following transfer function is:

z = [-500,-35000,-50000+40j , -50000-40j]

p = [-1000,-12000,-80000+40j , -80000-40j]

k = 1


Images attached to this report
Non-image files attached to this report
Controls General (GQuEST)
Chris Stoughton - posted 12:27, Wednesday 01 May 2024 - last comment - 17:14, Monday 06 May 2024(11544)
Latency comparisons

I'm discussing options with Ryan.  


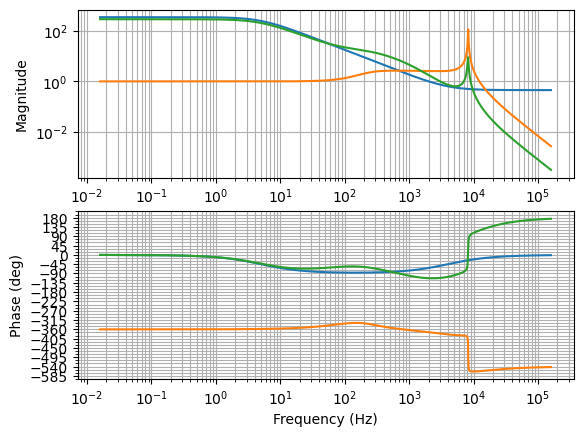
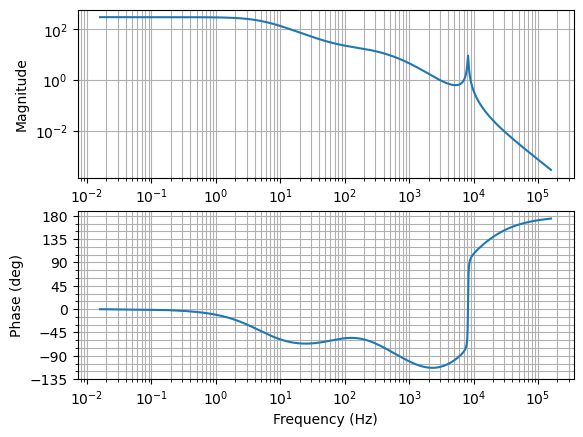
We are purchasing one LXD31k4 board, but notice that latency is not so great for the ADC and DAC on it.  For the ADC, the pipeline delay (latency) is 26 clock cycles/300 MHz = 87 nSec and for the DAC the latency is 134 clock cycles/300 MHz = 447 nSec.  


He found a low-latency (better than 4 nSec) DAC board AD9740-FMC-EBZ but with only 10 bits.  So we need to understand how to make that trade-off between #bits and latency.


This ADC card has 12 cycle latency at 125MHz, (96 nSec) dc-coupled, 16-bit, 4-ch + 1 DAC 

https://www.vadatech.com/product.php?product=900&catid_now=0&catid_prev=0#prettyPhoto

but the DAC on that one is the DAC3171 which can run up to 500 MHz for a 26 nSec latency at 14 bits.


Ryan found a discussion board on a low latency solution for ADC => FPGA => DAC (basically what we want!) from 8 years ago - looks like this was their conclusion on which chips to use:

The ADS5400 (1GSPS, 7ns latency) and DAC5670 (2.4 GSPS, 4.42 ns latency) are the lowest latency converters currently available.

Ryan is discussing what it would take to build a custom FMC board with these chips.


So, Ryan suggests these purchases to evaluate our options:

===================================================================

From a RedPitaya discussion board on a fast PDH controller:  https://forum.redpitaya.com/viewtopic.php?t=1354

by Nils Roos » Thu Mar 31, 2016 9:17 pm

From the datasheets of the ADC and DAC you can derive some estimates for the expected latency.

The ADC has a pipeline latency of 6 cycles plus some nanoseconds clock to output delay. At 125MHz this gives ~50ns latency from the moment the input is sampled to the moment the data is available at the FPGA. The FPGA's input buffers add one cycle, as do the output buffers, and then there is internal routing which typically comes to <10ns, so without any further processing, you get 26ns additional latency through the FPGA. The DAC has 2 cycles of data input to analog output latency, another 16ns. Thus, you end up with just under 100ns minimum delay from analog input to analog output.

===================================================================

For reference, RFSoC solutions claim to have about 120 nSec latency, depending on how they are configured.  (The sample we tested from Leo did NOT optimize at all for latency)


Comments related to this report
Chris Stoughton - 10:08, Thursday 02 May 2024 (11548)

Ryan adds this to the discussion:


I confirmed with Craig Drennan, in AD, that they are using this ADC in their MicroTCA solutions (but they only have AC-coupled) from Vadatech:

ADS42JB69

  • It is JESD204B at <5G, <$100 per channel, 16-bit, but 250Msps max.
    • This could be the perfect cost/speed match to the Artix-7
      • An Artix-7 at $400 would have 16 lanes for 16 ADS42JB69 channels (8 chips) at $100/channel = $2K in primary components for 16 ADC channels on a custom board.
    • We could likely benefit from the firmware they have already done (which maybe Jonathan did?) for their AC-coupled solution.


Then I asked:

Would we be able to have DC coupling on a custom board?

Does this leave room for DACs on the same board, or is it a total of 16 ADC+DAC channels? 

Looking at the data sheet,  in 10x mode the max sample rate is 250 MHz and the latency is given in two ways.

  1. Latency (N Cycles) is 23, and I calculate 23/250MHz = 92 nSec
  2. Typical Data Delay (t_0, ns) has the equation 0.65*t_s + 3 = 0.65/0.250 GHz + 3 = 5.6 nSec


and he responded:

Yes, definitely we can do DC coupling on the custom board.


We need to find a similar DAC solution. That is next. But it could be on the custom board too. I am imagining a 2nd Artix 7 using 16 lanes for DAC channels. And then the two Artix7s communicate with each other over GPIO.


If we make it in an RTF (uTCA rear panel) form factor, it would add scaling up ability (maybe AD would even use it).

Lee McCuller - 17:14, Monday 06 May 2024 (11551)GQuEST

The formuta for quantization noise is

12**0.5 * 10V * 2**(-N_bits) / (F_sample)**0.5 (in V/rtHz).

the factor 12 is for the uniform distribution, 10V ADC/DAC range. N_bits is the dynamic range of the ADC and the sample rate how fast you will be sample.

I think you should shoot for the 50nV/rtHz - 500nV/rtHz range. Slow ADCs and standard osc scopes get 1uV/rtHz, so this should ideally do better than those. With a 25MHz sample rate, that is going to take 14 or 16 bits. 10 or 12 bits appears to be a bit too low for noise. We can use frontend filters to help that, but then we need to add those to the boards (which we can do!).


I would say if you have some latency of T=250ns, then the sample rate only needs to be about 4x as high as that sample rate, or 4/T ~ 16 MS/s. So a sample rate of 25MHz would be about right for controls applications. 100MHz is better for data acq applications. It can be higher, if it still helps latency, but sometimes the number of needed clock cycles goes down with the sample rate.

Having an excessive sample rate, when it does not help latency, can be a bad thing since it makes designing filters worse (filters take more bits when they are faster).


Controls General
Torrey Cullen - posted 17:17, Tuesday 30 April 2024 - last comment - 15:40, Wednesday 01 May 2024(11543)
Importing a resonant gain filter into the moku

[Jeff, Ian, Torrey]

Python script that will create a resonant gain filter (passes all frequencies and boosts around a specified frequency) and convert it into a form that the moku will accept.

edit: this script is outdated, see below.

Non-image files attached to this report
Comments related to this report
Torrey Cullen - 15:40, Wednesday 01 May 2024 (11545)

Continuation from yesterday:

We went to upload one of these filters into the moku and found that upon doing so the piezo rings up quite loudly. The previous version of the script was creating an unstable filter (which is undistinguishable from a stable one in the view the moku has i.e. this. This version of the script has made the necessary correction.

With successful implementation of this filter in the digital filter box, I drove a tone at 300 Hz to match the frequency of the gain in the filter and observed the spectrum directly after the controller and after the DFB (bus 1 and bus 2 in the screenshot) Without the resonant gain filter the spectrum reads 178 uV/sqrt(Hz) @ 300 Hz for both channels. Applying the filter and checking the spectrum shows a large suppression in the noise in one of the channels (Bus 1 - 2.96 uV/sqrt(Hz) @ 300 Hz, directly out of the fast controller) and no supression in the second channel (Bus 2 - 194 uV/sqrt(Hz) @ 300 Hz, directly after the boost at 300 Hz is applied).


Images attached to this comment
Non-image files attached to this comment
GQuEST Output Filter Cavities
Torrey Cullen - posted 14:31, Monday 29 April 2024 - last comment - 14:31, Monday 29 April 2024(11541)
Cavity Calibration

As discussed in the most recent group meeting, here are my results for calibrating the cavity spectrum into a displacement spectrum. Attached is the notebook used to create this. Data for the script (explained in notebook as well) is in "\Nextcloud\GQuEST\B102\Output Filter Cavity\FilterCavityScansAndTFs\Monday-4-22\".

Images attached to this report
Non-image files attached to this report
Comments related to this report
Torrey Cullen - 13:43, Monday 29 April 2024 (11542)

For those that aren't on the nextcloud.

Non-image files attached to this comment
Controls General
Chris Stoughton - posted 09:29, Friday 26 April 2024 (11540)
Purchase requisition for one LXD31K4-DC placed

I received a quote from the company and submitted a purchase requisiton through Fermilab to purchase one.  The vendor has one on hand that can be shipped in a week after they receive the order.

GQuEST Output Filter Cavities
Torrey Cullen - posted 15:47, Monday 22 April 2024 - last comment - 13:42, Thursday 25 April 2024(11535)
Experimentally measuring FSR

My attempt at measuring the FSR of the cavity is off by ~20% of the expected value.

I scan the frequency of the laser and record the time between two 0,0 modes. The voltage between the two modes can be calculated from the scan amplitude and frequency. Then, the FSR of the cavity from experimental data should be:

t_start = -48.12e-3 #sec

t_end = 13.8383232e-3 #sec

scan_amp = 2 #volts

scan_freq = 5 #Hz

period = 1/scan_freq #sec

miliamp_per_V = 2e-3

meters_per_miliamp =  2.625e-10 #5e-12/20e-3

cav_len = 2.4

lambda_1 = 1550.08e-9

c = 3e8


delta_t = t_end - t_start

delta_V = delta_t/(period/2) * 2 * scan_amp


FSR = delta_V*(miliamp_per_V)*(meters_per_miliamp)*(c/lambda_1**2)

This gives an FSR of 162 MHz which is clearly way off. I think the discrepancy comes from the uncertainty in the number used for the wave wavelength change of the laser as a function of the pump current. I was eyeballing this before, but here i used the number from the data sheet orginally emailed along with our purchase of the laser. See Attached. He did not provide the raw data. I used a web plot digitizer to get the raw data. The increasing/decreasing.csv are the results of this. The slope of these give the number used in the above calculation.

TLDR: I think the frequency of the laser is a poor way to calibrate the FSR.

Images attached to this report
Non-image files attached to this report
Comments related to this report
Torrey Cullen - 13:42, Thursday 25 April 2024 (11539)

Lee suggested using this measurement to constrain the wavelength change of the laser as a function of pump current using the expect FSR of c/2.4 meters. Doing this yields 2.0198e-10 m/A. I am now using this number for all cavity calibrations.

Displaying reports 741-760 of 1093.Go to page Start 34 35 36 37 38 39 40 41 42 End